Showing posts with label bread. Show all posts

Saturday, 23 July 2016

Double chocolate banana bread, great way of using overripe bananas.


Dark and foreboding.... this is just the case, rich in chocolate flavours, you would swear it contains alcohol (it doesn't !) dense, moist and or so very moreish.


We've all experienced the guilt of overripe bananas sitting in the fruit bowl becoming progressively blacker and blacker, this recipe solves that dilemma. Based on a recipe by Smitten Kitchen this is an easy recipe and is an excellent way of using those manky bananas to their best effect.


What you need

  • 3 very ripe bananas - mashed
  • 1/2 cup butter (melted), or coconut oil. Cool slightly
  • 3/4 cup soft brown sugar
  • 1 large free range egg
  • 1 tsp vanilla extract
  • 1 tsp chocolate essence( I get mine from Bakery Bits)
  • 1 tsp bicarbonate of soda
  • pinch of salt (omit if using salted butter)
  • 1 cup plain flour (would probably work gluten free, but I haven't tested as yet)
  • 1/2 cup of cocoa (I always use Green and Blacks)
  • 1 pkt of dark chocolate chips / chunks
You will also require a 2lb loaf tin, oil sprayed and base lined. I prefer to use loaf tin liners

What you do
  • Pre heat your oven to 180c
  • Mix the mashed banana and butter, sugar and egg, essence in a large bowl or use a mixer.
  • Sieve in the flour, bicarb, cocoa and salt and fold until just mixed 
  • Stir in the chocolate chips and the scoop into your prepared tin
  • Level the top and place in the pre heated oven
  • Bake for 55 minutes or so until risen and tests cooked when a skewer inserted into the loaf shows its cooked through
  • Cool for 10 -15 minutes in the tin on a wire rack and then remove from tin and allow to cool fully.


We are linking up to several challenges this month

      We should Cocoa, theme this month is Anything Goes, hosted this month by Tin and Thyme.

            No waste food challenge hosted this month by Utterly Scrummy Food for Families.


Sunday, 8 May 2016

Middle Holly Cottage Tea Room and Cake Parlour - Afternoon tea


In Lancashire we pride ourselves on a warm and friendly welcome and there is no finer way to spend an afternoon then enjoying the delights of afternoon tea. On a cold blustery spring day we ventured forth to Middle Holly Cottage in Forton for such an afternoon.


On our journey up to Forton where Middle Holly is situated, we saw the cars temperature gauge plumet by 3 degrees and experienced hail, rain and thunder. Fortunately for us Middle Holly is really easy to find being situated just of the A6 and on arrival we were warmly welcomed into the cosy tea room and cake parlour by Gill who runs Middle Holly with her husband Andy. 

Originally from Cheshire but now firmly settled in Lancashire, Gill and I enjoyed a lovely chat about all things food, the WI (she's a member just like me), the Clandestine Cake club, catering for free from diets and Lancashire in general.


Gill is really passionate about her beautiful B and B and tea room being the best they possibly can and she carefully features the best  quality local and seasonal produce on her menu's. She wants all her customers to experience a warm, genuine and memorable experience when staying or eating at Middle Holly.

Gill makes all her own bread, cakes, jams, chutneys and her eggs come from her own  garden hens and sources all her other ingredients as locally as she can. For example she proudly serves Dewlay's Lancashire Cheese, which is little a few minutes walk down the road.


We were invited to experience the Deluxe Afternoon tea which was served in the pretty Garden Room area, thoughtfully decorated in country pastels and the tea, cakes and sandwiches all served on eclectic vintage china, complete with home knitted and crocheted tea cosies by Gill's Mum !

We started our tea with a shot glass of homemade seasonal vegetable soup, very tasty and flavourful which was very welcome given the weather outside, Gill makes sure that when she blends her soup you still have little chunks of vegetables so you can really taste the fresh vegetables in the soup.


Next came our tottering tower (cake stand), strewned with viola flowers, salad and herb leaves, and bedecked with finger sandwiches of home cooked ham, egg mayonnaise and Lancashire cheese and homemade chutney, all served on homemade organic bread. Gill likes to ring the changes and try different flours in the bread baking (most of the bread is made by Andy), so our selection was farmhouse white and  a seeded bread. The sandwiches were delicious, generously filled  and the homemade bread makes such a difference to the taste experience. Alongside our sandwiches we also had a little bowl of Lancashire Crisps, we love those too and again show careful thoughtful sourcing.

Our next  cake stand layer was a fruity raspberry fool served in a pretty vintage teacup and homemade crisp and light chocolate eclairs. The fool was perfectly balanced in terms of sweetness and tartness so as not to be cloying, the eclairs light and airy and filled with fluffy whipped cream.


The top layer of the stand has two huge pieces of cake, which we split in half so both myself and Mr LF could experience the floral rose and almond cake and slated caramel layer cake. Again all homemade, We particularly loved the salted caramel layer cake with its salty yet sweet topping. By this stage we were getting very full so we agreed with Gill to take away our scones (choice of fruit or plain), if you can squeeze them in they come accompanied with cream and  a choice of Gills Homemade jams. The scones are huge, and unlike a lot of other scones I have tried, not in the least bit disappointingly dry and tasteless, these were light and tasty, they were our treat later in the day when we returned home with the last of our homemade rhubarb and strawberry jam.


Last but not least a handmade homemade truffle each, just to round things off !! 

Outside Middle Holly has views over to the Bowland Hills, a little misty and obscured whilst we were there due to the inclement downpour but stunning non the less. 

We loved our visit to Middle Holly and meeting and chatting with Gill, despite it being an awful day the tea room was still fairly busy, so if you are planning a visit I would book just to be on the safe side as given the high standard of afternoon tea and cake on offer, Middle Holly is sure to be very popular. The tea room is currently open Thursday, Friday and Saturday and in the summer on Sundays too.

Check out the website for further details of the tea room and B and B


Our meal was provided free of charge for review purposes, we were not compelled to write a positive review and all thoughts and opinions are our own.


Monday, 7 July 2014

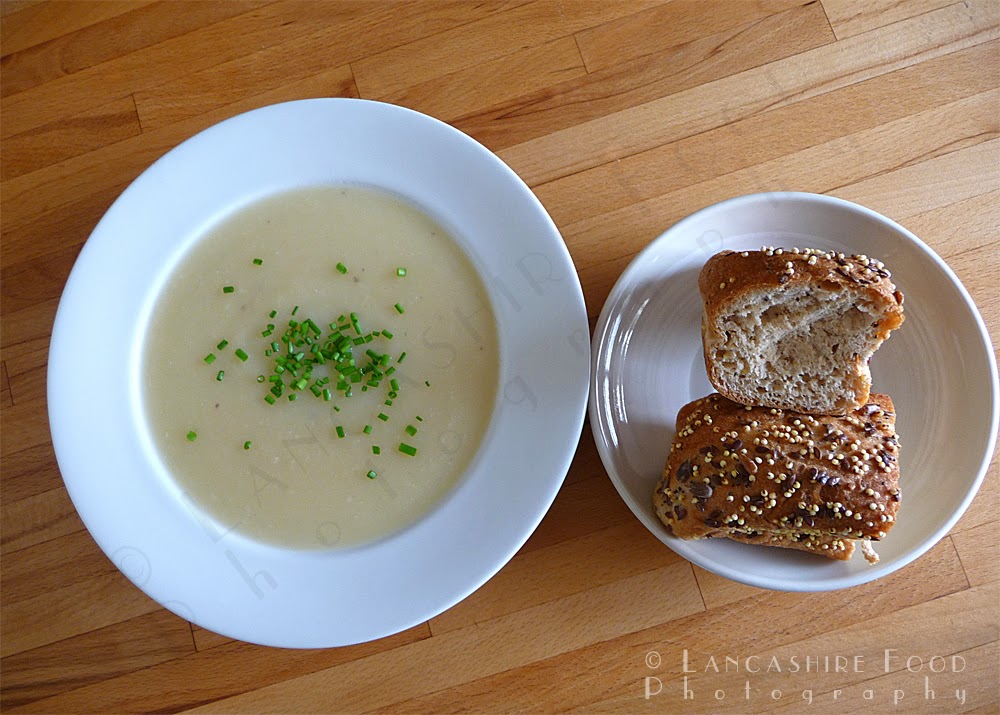
Surprise turnip soup

A couple of weeks ago I instagrammed a piccie of a surprise turnip I had found growing in the garden, amongst our pak choi plants and I asked for suggestions for utilising our surprise addition to the larder. With ideas ranging from turnip cake (!), turnip gratin (much better) I decided to take up the suggestion of Irwin Kraus from Massachusetts of a turnip soup.


Based on a recipe from About.com this soup provided a quick and easy supper dish which used up our surprise turnip. The recipe is easy and quick to come together just watch the amount of pepper you add as the turnip has a little heat already.

What you need
  • 1 surprise turnip (or 4 small white turnips) - peeled and chopped into cubes
  • 1 large white potato - peeled and chopped into cubes
  • Butter or vegetable oil - about a tbsp
  • 1 large onion - peeled and chopped
  • 1 clove of garlic - peeled and crushed
  • About 1/2 cup of white wine
  • Vegetable stock - about 500ml may be more
  • Salt and pepper to taste
  • Chopped chives for decoration
What you do
  • Heat the oil / butter in a large sauce pan and add the onion, garlic and turnips, cook gently for 2 -3 minutes until the onion starts to soften a little and go see through.
  • Add the wine to the pan and simmer for a few minutes until a little reduced
  • Next add the potato and vegetable stock to the pan
  • Bring to the boil and simmer until the vegetables are softened
  • Remove from heat and allow to cool slightly, add more stock or water if required.
  • Puree with a stick blender to the desired consistency.
  • Taste and  season with salt and pepper
  • Bring back to a simmer and serve sprinkled with chopped chives


The bread pictured is gluten free and is from a fantastic bakery in Scotland - Wheat Free Bakery Direct, there bakes are amazing.

I'm linking up this to this months Credit Crunch Munch hosted this month by Maison cupcake, created by Fuss Free Flavours and Fab Food 4All.

                                           Credit-Crunch-Munch.gif

Also to No Waste Food Challenge hosted this month by Anne's Kitchen and created by Tangoraindrop.

                                                         
And also to Simple and In Season this month hosted by My custard Pie and created by Ren Behan.

                                                          Simple and in Season - enter your post on mycustardpie.com

Wednesday, 30 April 2014

The Ginger Baker


Its with great pleasure that I am writing this article telling you about a new cafe / bakery / tearoom that has recently opened in the Ribble Valley village of Longridge. What makes "The Ginger Baker" so special is that its a mainly "gluten free" venue, Sharon the Ginger Baker who has been baking Gluten Free for several years has had dreams of opening her own venue for years, so she jumped at the chance when this cute venue became available in heart of Longridge.


The Ginger Baker stocks a wide range of gluten free treats, snacks and breads along side great coffees and drinks at great prices. The breads range has been sourced from Wheat Free Bakery Scotland which is all gluten free and it tastes, looks and smells amazing. The cakes and pastries are a either carefully sourced from Gluten free bakeries or baked on the premises by Sharon and her team.


Situated in the heart of the village there is ample local parking for your visit and you can book afternoon teas and special events with the tea room.


Its well worth a trip especially if you need a Gluten Free diet  and the welcome is warm and genuine, you can find the venue on Berry Lane, Longridge. You can also find the Ginger Baker on Facebook and twitter too.


Sunday, 9 March 2014

Lekue - lets make bread, gluten free bread !


Gluten fee bread that looks and tastes (well similar) to real bread is the holy grail, yesterday on baking a Dan Lepard recipe I came close, very close to nirvana. This recipe has the praise of various bloggers across the world and is also featured on the BBC Food website,  so given that I had a lekue bread maker to give a whirl I thought I would give it a try and wow, I wasn't disappointed. The resultant bread had a crunchy crust and a texture heading toward a real crumb structure, it even rose a little and had a tiny bit of oven spring.

The recipe features two ingredients that make all the difference to gluten free bread baking, pysllium husk and golden linseed (aka flaxseed) both of which have gummy properties (there is no other way of putting it) which help give the bread stretch and which help make the crumb softer. The linseeds also help give the bread a "wheaty" like flavour.

I think the bread would be ideal toasted along side pate or toasted and topped with cheese and beans, its more like an artisan crusty cob loaf than sandwich bread.


What you need

  • 30g golden linseeds
  • 475ml warm water
  • 2 1/2 tsp fast action yeast
  • 100ml natural yogurt - I used greek yogurt
  • 450g cornflour
  • 1 tsp salt
  • 1 tsp caster sugar
  • 50g psyllium husk powder
  • 50ml olive oil
  • Extra olive oil and cornflour to finish
What you do 
  • In a bowl mix the yeast and water, so the yeast starts to become active, stir in the yogurt and the baked linseeds. Mix this all together.
  • In the lekue baking bowl I had weigh out the cornflour, psyllium husk, salt and sugar.
  • Add the yeast mix and olive oil into the dry ingredients and mix well, do this quickly as it rapidly starts to seize.

  • Once the mix is firm enough knead it for about 10 seconds ( I did this in the bowl), cover and leave for about 30 minutes, I did this by folding up the bowl.
  • After the 3 minutes has passed shape the dough ready for baking, either on a tray lined with baking paper or in my case in the bowl,. Brush the top of the dough with a little extra oil and cover and leave to rise for 30 minutes (and amazingly it did a little) covered or in the lekue bowl.

  • Pre heat your oven to 220c fan / 240c normal , uncover the dough and slash the top and sprinkle with a little cornflour. Bake for approx 40 minutes or so until a good colour is achieved.

  • Leave to cool on a wire rack until fully cold before cutting

The dough is versatile enough to be suggested for buns or a foccacia sheet also.

The recipe is adapted slightly from Dan Lepard's recipe on BBC Food and I used the Lekue Bread maker which had been provided to me by Lekue for review purposes.


Sunday, 24 November 2013

The best fruited buns, ever !


These buns are amazing, soft, aromatic and stuffed full of fruit and spices, the perfect combination of flavours and great toasted or served simply buttered. Ok, so perfect buns aren't an instant thing but I promise you these buns are worth the additional effort and like any bread recipe its all about planning what you will do in the time your dough is working.


The other good thing is that you are in control of what you want in your buns, so in this mix we have a little crystallized ginger and chopped figs alongside the more traditional, raisins, sultanas and citron peel (hand chopped, ready chopped peel is vile), and you wouldn't want to spoil these amazing buns. To create the soft texture you need to use some fat in your dough, lard and dripping work well but you can also use white chocolate or even milk chocolate at a push, it makes the dough have a soft crumb, just the texture you want for your buns.

The buns would be great for festive celebrations and would easily adapted for Easter too, but frankly you'll love them so much you will eat them all year round !

What you need
  • 600g strong white bread flour
  • 150ml skimmed milk
  • 14g dried yeast (2 pkts)
  • Approx 120ml warm water but this will depend on your flour and the temperature in your kitchen
  • 1 tbsp golden syrup (you could maple syrup or honey instead)
  • 25g caster sugar
  • 50g white fat (dripping, lard, chocolate)
  • 300g dried fruit mixed (whatever you like)
  • 1 1/2 tsp mixed spices (ginger, nutmeg, cardamon, cinnamon, feel free to mix and match)
  • 1 tsp finely ground salt
  • 3 eggs - free range please
  • Another egg for glazing purposes
What you do 
  • Dissolve the yeast in the warm water, I always add a little flour as I find this get the yeast activated more quickly and leave in a warm place until frothy and the yeast is clearly active.
  • Warm the milk and the syrup, caster sugar, white fat until melted and then add the spices, salt and the dried fruits. Allow to cool.
  • Add the beaten eggs to the cooled milk mixture.
  • In a large bowl combine the flour, yeast mixture and egg and milk mixture, stir until you have an loose dough. Leave this to rest for about 10 minutes covered, then knead again, do this again a couple of times but leaving it rest longer in between.
  • You should eventually have a soft well combined active dough, divide this your require number of buns, I went for 10 but these were monster sized.
  • Form balls and press flat, leave these to rest again on oiled trays until doubled in size, covered in plastic so the dough doesn't form a skin ( as this is an enriched dough it may take several hours)
  • Bake at 200c in a pre heated oven, brush the tops with a beaten egg if you want a shiny top.
  • They will be ready after about 15 minutes or so when well risen and golden on top, don't overcook them as they will go dry.
  • Cool on a wire rack and devour slathered with butter, toasted or just as they are.


I am entering this post in the Tea time Treats challenge hosted by Karen over at Lavender and Lovage and Kate who blogs over at What Kate baked. The theme is "Dried Fruit" and I think this bun more than qualifies.

                                                Tea Time Treats


Monday, 12 August 2013

Tomato focaccia

We love focaccia of all types and being lucky enough to have picked a large bowl of cherry tomatoes from the garden, we decided to use some of our bounty in a lovely fresh focaccia. Focaccia is a great bread to make and share with friends, especially if you have some great oil and vinegar to serve with it. Serve on a platter fresh from the oven Italian stylee, another bonus of this recipe is that you can use handfuls of fresh herbs just picked from the garden, I love this time of year when the garden is bountiful !


What you need

  • 20g dried yeast
  • 2 tsp sugar dissolved in warm water - 300ml
  • 450g strong white bread flour (organic if you can get hold of it)
  • Fresh thyme - picked and roughly chopped - 1tbsp
  • Fresh rosemary - picked and roughly chopped - 1tbsp
  • 1 1/2 tsp fine sea salt
  • 4 good tbsp extra virgin olive oil - the best you can afford it does make a difference
  • cherry tomatoes - halved if large
  • Extra virgin olive oil - for sprinkling
  • Sea salt - proper crystal flakes for a great finish
What you do
  • Mix the yeast into the sugared warm water, leave to one side until the yeast is frothy, you are now ready to bake
  • Place the flour, herbs and salt into a large bowl, ensure the salt is well distributed throughout 
  • Make a well in the centre and mix in half of the yeast mixture, mix with your fingers , keep adding liquid and mixing, now add the olive oil, still mixing and semi kneading until you have a soft slightly sticky dough.(Depending on your flour and the weather will depend on whether you need all the liquid)
  • Lightly flour the work surface and knead the dough for 10 minutes until you have a soft elastic dough.
  • Put the dough in lightly oiled bowl and cover to rise until doubled in size, in a warm kitchen this will take approximately an hour.
  • Meanwhile oil your baking tray or roasting dish with a little olive oil, remove dough from bowl and place in roasting dish, squishing with your fingers to one level and to the edges and corners of the pan.
  • Cover the pan with a large plastic bag or clingfilm which you have lightly oiled to prevent the dough from sticking to it when rising.
  • Let this prove for about 30 minutes
  • Pre heat the oven to 190c 
  • When ready to bake, press the your fingers all over the dough to make little dinks in the dough for the tomato pieces, once you have used all the tomatoes, sprinkle with a little more olive oil and some sea salt flakes.
  • Bake for approx 30 minutes or so until golden and well risen
  • Delicious hot or cold, once baked and cooled it also freezes well, double wrapped in foil

The fabulous photography is once again by the talented Mr Lancashire Food 

Thursday, 1 August 2013

Cinnamon and raisin bagels

I love bagels, particularly cinnamon and raisin one's, toasted for breakfast buttered they just can't be beaten. Mr Lancashire Food as you all know is rapidly becoming the expert bread baker in our household, however for the time being he is sticking to savoury bakes. I had a craving for a sweet bake so I thought I would give bagels a try after seeing a few other bloggers having a go at them recently but I wanted a sweet bagel, the kind that works with cool cream cheese or slathered (that word again !) in butter, so much so it runs down your fingers when your eating it.


I think the boiling the dough thing puts a lot of people off making bagels so I was pleased to spot that one of my favourite American food bloggers Averie Cooks had been experimenting with bagels without the boiling stage. So the game is on, using her recipe our first bagel making adventure began, I was very impressed as to how easy they were to make and even Mr LF liked them and he is not normally a fan of sweet bread recipes. The bagels freeze well but the recipe makes about 8 bagels so depending on your household size you may not need to store them at all.


What you need
  • 1 cup of warm water 
  • 1 1/2 tbsp granulated sugar
  • 2 1/4 tsp dried yeast
  • 2 1/2 cups strong white bread flour plus a little more for dusting surfaces
  • Sea salt - pinch of
  • 1 tbsp ground cinnamon
  • 3/4 cup raisins
  • Polenta for dusting the trays
What you need to do
  • Firstly activate your yeast, by mixing the warm water, sugar and dried yeast in a bowl or jug and stir together well, leave to side for about 10 minutes until the mixture is bubbling well.
  • Now in your stand mixer, place the flour and salt (if using) and start to meix gently with the dough hook attached, adding the yeast mixture, until well incorporated, the volume of yeast mixture you need to use with vary with your flour, temperature and humidity.
  • Now knead in the mixer for about 5 -7 minutes until you have a smooth elastic dough
  • Add the cinnamon and raisins and continue to knead to incorporate the raisins and cinnamon, don't be alarmed by the quantity of cinnamon it will knead in.
  • Place the dough in a bowl covered by clingfilm and allow to rise until doubled in size.
  • Tip the dough out onto a lightly floured surface pushing back any raisins that fall out
  • Divide the dough in to 8  equal sized pieces and shape into a ball, using your fingers make a hole in the middle to form a bagel.
  • Leave to rise for 30 minutes or so covered with oiled clingfilm until risen
  • Pre heat your oven to 200c / 400F
  • In a large bowl filled with hot water, place the bagels for about a minute, turn them over after about 30 seconds.
  • Place on a baking sheet sprinkled with the polenta to stop your bagels from sticking and burning on the bottom.
  • Bake for 18 -20 minutes until well risen and golden, they will smell amazing
  • Allow to cool on the baking tray and serve immediately buttered or alternatively split and toast.


Saturday, 8 June 2013

No knead bread

I was reading an article last week in the Saturday Times about essential kit in a foodies kitchen, needless to say our kitchen contains quite a few of the items quoted, it also mentioned about having a recipe for "no knead bread" which reminded me this was something I have been  planning to give a try for along time, the original no knead recipe was first published in 2006, I think in the New York Times. The internet is littered with recipes all much the same so I am going with the classic. So here we are a week later and our first foray into no knead baking is cooling in the kitchen.


The idea is that rather than knead the dough to activate the gluten, time does the hard work for you something that is lacking from many modern bakes, you are aiming for an artisan holey style loaf not a fine crumb structure, the resultant bake is rustic and humble. I like it and its ideal to serve as bruschetta, with oils and vinegars and along side salads.

The mix should also be able to cope with substituting different flours, so next time I might have an experiment. I'll let you know how I get on.

Ingredients
  • 3 cups bread flour
  • 1 tsp of dried yeast ( quantities vary and this will depend on whether you are using dried or instant acting yeast)
  • 1 1/2 tsp salt
  • 1 1/2 cups water
  • You are also going to need a large cooking pot with a lid, I used my cast iron Le Crueset, but you can use Pyrex, etc.
Method
  • Mix all the above in a bowl with a wooden spoon, try not to be precious as soon as its mixed leave it alone. Cover with film ( I use a shower cap) and leave for 12 - 18 hours or so in the kitchen.
  • Return to your dough and see that it has risen and nice a bubbly.
  • Turn onto a heavily floured surface or tea towel and using well floured hands or a scraper form into a rough ball, don't worry the dough will be very sticky and loose.
  • I then placed mine in a baking parchment lined proving basket ( or use a bowl) for about 30 minutes
  • Meanwhile preheat your oven to 230C / 450f , once up to temperature then place your baking pot with lid to preheat for about 30 minutes
  • Now place your dough with baking parchment in the pot and replace lid, put in oven and bake for 30 minutes with the lid on, remove lid and then bake for a further 15 - 30 minutes until golden brown.
  • Remove bread from oven and allow to cool on a wire rack.
Next time I might allow the dough to have a longer second rise ( up to 2 hours) as per the classic method and also may be reduce the quantity of yeast initially added.


Wednesday, 8 May 2013

Ale and spelt bread for #Boothscheers

Mr Lancashire Food is developing quite a talent for bread baking and one of his tastiest bakes so far has been a Ale and spelt bread he baked specially for #Boothscheers Beer and Cider festival, this bread is great served with soup, cheese and particularly smoked fish such as hot smoked salmon or gravalax as the beery hoppy nutty notes particularly complement the oilliness of the fish. Its a relatively straight forward recipe in bread terms and also features my favourite bread grain spelt too.


Ingredients

  • 175g spelt flour
  • 275g strong white bread flour
  • 7g of dried yeast
  • 7g of salt fine grain
  • 100ml of ale ( We used Stringers Delta V) but any ale would do
  • 100ml of water
  • 100ml of skimmed milk ( or you could use watered down yogurt) or just more water
  • Good squirt of honey - (about 1/2 tbsp) you could use brown sugar
  • knob of butter
You'll also need a round proving basket, floured well.


Method

  • Place the butter, milk, beer, honey and water in a pan and warm until the butter has melted, leave to cool until just warm to the touch
  • Place all the other ingredients in the bowl of your mixer and attach the dough hook , give it a quick run to distribute the yeast and salt .
  • Now add the cooled liquid mixture to the bowl with the mixer running on slow until you have added all the liquid, don't worry if it looks like it won't come together as it will.
  • Now leave your mixer doing the work on a slow setting for approximately 6 minutes or so until you have a soft elastic dough.
  • Scrape out your bowl onto a floured surface and shape into a round , now place in an oiled bowl, cover with plastic wrap or a shower cap and leave until doubled in size
  • Turn out onto a floured surface and knock back the dough with your fingers, now reshape in a ball and place in your well floured proving bowl, cover and let prove until doubled in size again.

  • Preheat the oven to 200c
  • Gently turn out onto a silicone baking mat or silicone paper , bake for approx 30 minutes until well risen, golden and so that it sounds hollow when tapped.
  • Allow to cool on a wire rack.


Sunday, 6 January 2013

Mushroom, onion and thyme focaccia

Another baking adventure from Mr Lancashire Food, this time a twist on the Italian delight - focaccia. We love mushrooms in our household and decided that we would experiment by adding cooked mushrooms and onions to a traditional focaccia mix.


The resultant focaccia was absolutely delicious, it was fortuitous that we made two slabs of this crusty delight, as the first one disappeared within minutes. We used large open capped mushrooms but you could use button or if feeling especially decadent wild mushrooms instead, if you are using dried mushrooms you will need to reconstitute them first before cooking.

As with all bread baking the secret is time, allowing your dough to rise fully and prove, this time creates the  flavour in the dough.

Ingredients

  • 500g strong white bread flour
  • 1 1/2 tsp sea salt
  • 7g dried yeast
  • 70ml olive oil
  • Warm water to mix - hard to be precise as this all depends on your flour
  • Roughly 100g of mushrooms ( whatever type) - chopped finely
  • 1 large white onion - chopped into fine half rings
  • Thyme ( fresh or dried)
  • Salt and olive oil for sprinkling 
  • Little oil or butter to cook your mushrooms and onions in
Baking tray or shallow baking pan 

Method
  • Firstly cook the onions and mushrooms in a little oil or butter until softened but with hardly any colour, allow to cool, stir in your thyme.
  • Now mix the flour, sea salt, yeast and liquids to a  make a soft sticky dough, add the water last and mix by hand so you can judge the consistency of the dough
  • Once combined knead well on lightly floured surface, until the dough is pliable and stretchy
  • Place in a bowl and allow to rest  in a warm place for at least an hour or so until your dough has doubled in size
  • Add the Mushroom, onion and thyme mixture to the dough pressing in with your hands
  • Now place your dough on your baking sheet / pan and shape by pressing out with your fingers to cover the tin to the edges, allow to prove for approx 30 minutes covered with a tea towel
  • Now using your fingers prick all over the surface of your focaccia to make dimples, sprinkle with olive oil and sea salt crystals, leave to prove again for another hour or so
  • Bake in a preheated oven at 200c for approximately 25 -35 minutes until golden brown
Delicious served with Italian salami, cold meats, olives or oil and vinegar.


I am entering this post in "Herbs on Saturday" blog  challenge for January 2013 challenge from Lavender and Lovage and this  month hosted by Bangers and Mash.


Related Posts Plugin for WordPress, Blogger...